 ChatGPT,
 Claude,
 Gemini,
 Grok — all four for
Key highlights
- Follow this OpenClaw GitHub guide to clone the repository, install OpenClaw and complete the setup step by step.
- Understand common OpenClaw installation errors and learn how to identify and fix setup issues quickly.
- Explore the OpenClaw GitHub repository to find the source code, project structure and documentation required before installation.
- Learn the key configuration steps needed after cloning GitHub OpenClaw to get your OpenClaw instance running correctly on a server.
Developers increasingly want AI systems they can run within their own infrastructure instead of relying entirely on external SaaS tools. OpenClaw is an open-source platform for building AI agents, automating workflows and managing AI tasks in a self-hosted environment.
This OpenClaw GitHub guide covers installation from the repository, required tools, source code setup and configuration for local or server deployment. You’ll learn how to clone the repository, prepare the config file, connect OpenClaw, start the OpenClaw gateway and verify that OpenClaw runs correctly. The guide also explains common installation errors, environment variables and GitHub operations where relevant.
By the end, you’ll know how to install, configure, troubleshoot and run an OpenClaw instance with greater control over data, integrations and execution.
What is OpenClaw on GitHub?
OpenClaw is an open-source AI automation platform available on GitHub that allows developers to build, run and manage AI agents within their own infrastructure. Instead of relying on external SaaS AI tools, OpenClaw lets teams create self-hosted AI systems that integrate directly with internal workflows, APIs and applications.
By running OpenClaw locally or on a VPS server, developers gain full control over their data, AI models and automation logic. This makes it useful for organizations that want to move from simple AI experiments to reliable, production-ready AI workflows running inside their own environment.
Also read: What Is OpenClaw AI? The Open-Source AI Agent Explained
1. Overview of the OpenClaw repository
The OpenClaw GitHub repository contains the complete source code required to install and run the platform. It includes the OpenClaw CLI, backend services and a web dashboard used to manage AI agents and workflows.
Developers typically clone the repository, install dependencies and build the project locally before launching the OpenClaw gateway. The repository also contains configuration files, scripts and documentation that guide the installation process.
2. What developers use OpenClaw for
Developers use OpenClaw to build AI-powered automation systems that can operate across multiple tools and services.
Common use cases include:
- Creating internal AI assistants
- Automating workflows and repetitive tasks
- Connecting AI models to APIs and tools
- Running autonomous AI agents
- Integrating AI into messaging platforms like Slack or Discord
Because OpenClaw supports tool calling, workflow pipelines and multi-step reasoning, it enables teams to create repeatable AI processes instead of one-off prompts.
Also read: VPS With High RAM: Boost Speed, Stability and Scalability for Your 2026 Projects
3. System requirements before installation
Before installing OpenClaw from GitHub, make sure your environment meets the basic system requirements.
Recommended minimum specifications:
| Component | Requirement |
| CPU | 2–4 cores |
| RAM | 8 GB recommended |
| Storage | 10 GB available space |
| Network | Internet access for dependencies |
You also need a supported operating system, Node.js v22 or higher and the pnpm package manager installed before starting the setup process. For a quick walkthrough of getting started with Bluehost, watch How to Purchase OpenClaw Self-Managed VPS.
Also read: VPS Hosting for Developers: Full Control, Speed and CI/CD Support
What are the prerequisites for installing OpenClaw?
To install OpenClaw from GitHub source code, you need a supported operating system, Git, a compatible Node.js version and the pnpm toolchain. You also need internet access to clone the repository and download project dependencies.
This OpenClaw GitHub guide focuses on a source installation, so these requirements should be ready before you clone the repository, build the source code and configure your OpenClaw instance.
Supported operating systems
OpenClaw supports macOS, Linux and Windows. The best environment depends on whether you are testing OpenClaw locally or running a self-hosted OpenClaw instance on a server.
1. macOS
OpenClaw supports macOS for local development and testing. You can use Terminal to clone the GitHub repository, install dependencies and run the OpenClaw gateway.
Make sure Git and a supported Node.js version are available before starting the source installation.
2. Linux
Linux works well for local development and VPS deployments. Common distributions such as Ubuntu and Debian provide the Git, Node.js and terminal tools required for a source-based installation.
Linux is also a practical choice when you want OpenClaw to run continuously as a self-hosted service.
Also read: Linux Hosting: Introducing a Reliable, Cost-Effective Hosting Solution
3. Windows
OpenClaw also supports Windows. Users can install OpenClaw through its Windows options or use a WSL2 environment for Linux-based Gateway workflows.
For the GitHub source workflow covered in this guide, make sure your environment can run Git, Node.js, Corepack and pnpm commands.
Required software
Before cloning the OpenClaw repository, check that the following tools are available:
| Tool | Requirement | Why you need it | Check or setup |
|---|---|---|---|
| Git | Current supported version | Clones and updates the OpenClaw GitHub repository | git –version |
| Node.js | 22.22.3+, 24.15+ or 25.9+ | Runs OpenClaw and its development tools | node -v |
| Corepack / pnpm | Repository-pinned pnpm version | Installs dependencies and builds OpenClaw from source | corepack enable |
| Terminal | Bash, Zsh, PowerShell or equivalent | Runs Git, installation and OpenClaw commands | Open your preferred terminal |
| Internet connection | Required during setup | Downloads the repository and project dependencies | Verify network access |
Node 26 is currently the recommended runtime. For a GitHub source installation, OpenClaw recommends enabling Corepack so the repository can use the pnpm version specified by the project.
1. Check Node.js
Check the installed Node.js version:
node -vYour version must match one of the currently supported Node.js branches. If it does not, install a supported release before continuing.
2. Check Git
Git is required because this installation method downloads the OpenClaw source code directly from GitHub.
Check whether Git is available:
git --versionYou do not need a GitHub account simply to clone the public OpenClaw repository.
3. Enable Corepack and pnpm
For source builds, OpenClaw uses pnpm to install dependencies and build the project. Enable Corepack first:
corepack enableCorepack allows the checkout to select the pnpm version defined by the OpenClaw repository instead of relying on an unrelated global pnpm version.
4. Prepare a terminal
You need a command-line environment to clone the repository, install dependencies, build the application and start the OpenClaw gateway.
Common options include:
- Bash
- Zsh
- PowerShell
- Windows Terminal
- A WSL2 terminal
Once these prerequisites are ready, you can clone the repository and begin the OpenClaw source installation.
Do you need GitHub CLI to install OpenClaw?
No. GitHub CLI (gh) and gh auth login are not required to clone and install the public OpenClaw source code.
They become relevant if you later connect OpenClaw to a GitHub account for GitHub operations such as accessing private repositories, working with pull requests or performing repository actions.
OpenClaw can use GitHub CLI credentials, and its recommended GitHub connection flow can manage a GitHub identity for agent tools. When enabling repository access, grant only the permissions required for the tasks your AI assistant needs to perform.
For a simpler self-hosted setup, explore Bluehost OpenClaw VPS hosting to run your OpenClaw instance with dedicated resources and full server control.
How do you install OpenClaw from the GitHub source code?
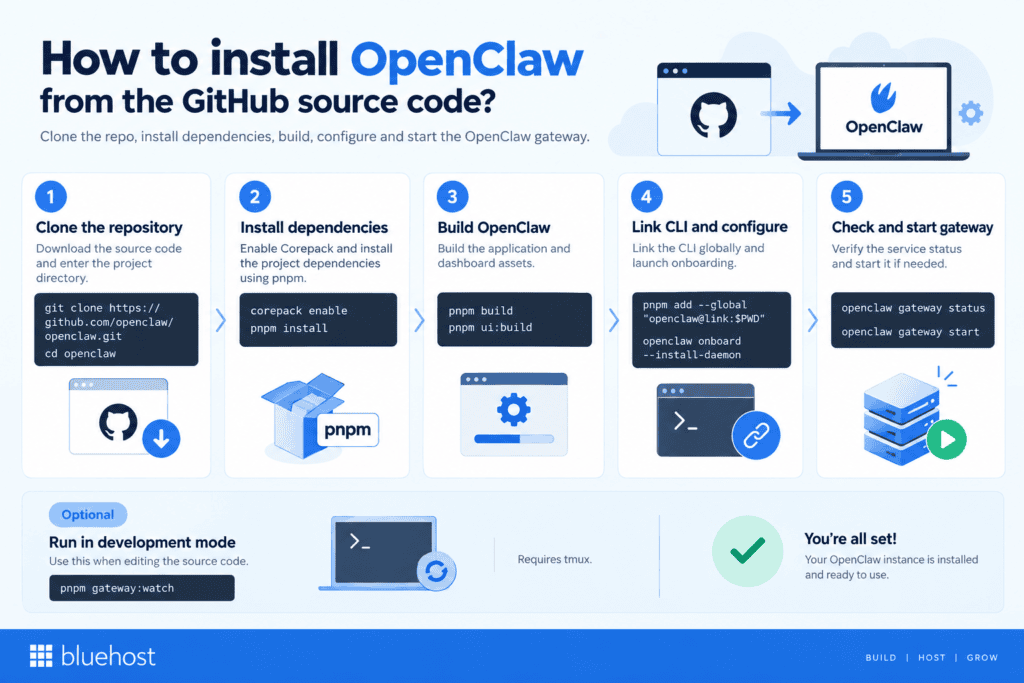
To install OpenClaw from GitHub, clone the repository, install dependencies with pnpm and build the application. Then link the CLI, complete onboarding and start the OpenClaw gateway. A source installation suits developers who want to modify OpenClaw or contribute code.
This OpenClaw GitHub guide covers installation using a Bash-compatible terminal on Linux, macOS or Windows through WSL2. For VPS deployment, run these commands on your server.
Step 1: Clone the OpenClaw GitHub repository
Download the source code and enter the project directory:
git clone https://github.com/openclaw/openclaw.git
cd openclaw
Keep subsequent build commands inside this directory. Cloning creates a local copy of the repository without changing the original project.
You do not need GitHub CLI, a GitHub account or write access for this public HTTPS clone. There is no need to run gh auth login for these installation steps.
Step 2: Install project dependencies
With Corepack available, enable it and install the project dependencies:
corepack enable
pnpm install
Corepack selects the pnpm version specified in the repository’s package.json. This keeps your package manager aligned with the project instead of using an arbitrary global version.
Use pnpm for the source installation. Running npm install at the repository root does not prepare OpenClaw’s complete workspace and bundled plugins.
Step 3: Build OpenClaw and its dashboard
Build the application, followed by the dashboard assets:
pnpm build
pnpm ui:build
Wait for each command to finish successfully before continuing. These steps prepare OpenClaw and its browser-based control interface for use.
Step 4: Link the CLI and configure your OpenClaw instance
Make the openclaw command available outside the repository by linking your checkout:
pnpm add --global "openclaw@link:$PWD"If pnpm reports that its global binary directory is missing from PATH, run pnpm setup. Reopen your terminal, return to the repository directory and retry the linking command.
Next, launch onboarding:
openclaw onboard --install-daemonFollow the prompts to connect OpenClaw to your chosen model provider and configure your AI assistant. Setup covers model configuration, provider authentication, workspace settings and gateway access. The –install-daemon option installs a background gateway service.
Authentication options depend on the provider and may include API keys, supported sign-in methods or references to environment variables. Messaging channels can be added during the applicable setup flow or configured later.
To locate your active config file, use:
openclaw config fileThis reports the configuration path used by your OpenClaw instance.
Step 5: Check and start the OpenClaw gateway
Check whether the background service is running:
openclaw gateway statusIf the service is installed but stopped, start it:
openclaw gateway startThe start command leaves an already-running managed gateway unchanged. If no service is installed, it provides installation guidance instead.
Keep gateway authentication enabled and use loopback binding during initial setup. These settings restrict network access while you configure your self-hosted instance.
Optional: Run OpenClaw in development mode
Use development mode when editing OpenClaw’s source code, not as a required installation step:
pnpm gateway:watchThe current watcher uses a tmux session and reloads the gateway when relevant source or configuration files change. It also stops the active profile’s installed gateway service before taking over its port. Ensure tmux is available before using this workflow.
Once the gateway is running, continue with the installation checks and dashboard verification in the next section
How can you verify that OpenClaw is installed correctly?
To verify OpenClaw, check the CLI, validate your configuration and confirm the gateway is running. Then open the dashboard and send a message to your AI assistant. These checks test your OpenClaw instance beyond simply confirming that the source code builds successfully.
Check the gateway health and status
Run the following checks on the machine where OpenClaw runs. Use the same user account and profile used during setup.
1. Check the CLI and configuration
Confirm that the OpenClaw command is available:
openclaw --versionThis prints the installed CLI version. It does not confirm that the gateway or model provider is working.
Next, locate your active config file and validate its settings:
openclaw config file
openclaw config validate
The first command displays the configuration path. The second checks your configuration against OpenClaw’s schema without starting the gateway. Successful validation does not prove that your model configuration can authenticate with external services.
2. Run OpenClaw diagnostics
Use the diagnostic command to identify configuration, gateway and installation issues:
openclaw doctorRead the reported findings and follow the relevant repair guidance. Doctor can perform configuration migrations and offer repairs, so review its prompts carefully.
When the findings recommend automatic repairs, run:
openclaw doctor --fixThis applies supported repairs and can modify configuration or stored state. Back up important settings first. It does not guarantee that every installation issue will be resolved.
3. Check gateway connectivity and service status
Check the OpenClaw gateway, then request its health snapshot:
openclaw gateway status
openclaw health
For a managed service, look for a running gateway and a successful connectivity probe. The health command provides additional information about configured channels, agents and session state. Neither check replaces testing an actual AI response.
For a broader overview, run:
openclaw statusUse openclaw status –all for more detailed, read-only diagnostics. Use openclaw status –deep to request live checks of supported messaging channels.
On Linux, the default installation uses a systemd user service. Check it with:
systemctl --user status openclaw-gateway.serviceNamed profiles can use a different service name. This command applies to a systemd-managed installation, not a gateway running only in your terminal. For a guided setup, watch How to Configure OpenClaw Agent.
How do you access the OpenClaw dashboard?
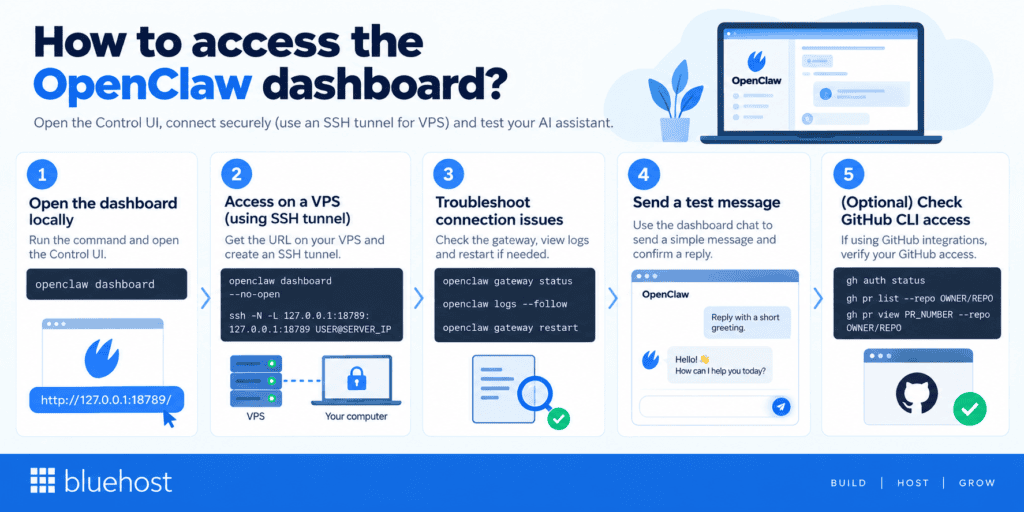
Run openclaw dashboard to open the browser-based Control UI. For a VPS installation, use an SSH tunnel to access it from your computer without exposing the gateway publicly.
1. Open the dashboard locally
On the computer running OpenClaw, enter:
openclaw dashboardThe command opens the Control UI and provides a browser authentication flow. Keep any generated access link private.
For a default local installation, the dashboard address is:
http://127.0.0.1:18789/You can also use http://localhost:18789/. A customized port, base path or TLS configuration changes the address, so check your gateway settings.
2. Access a self-hosted instance on a VPS
On your VPS, display the dashboard connection information without launching a browser:
openclaw dashboard --no-openThis prints the dashboard URL for manual access.
Next, open a terminal on your own computer and create an SSH tunnel:
ssh -N -L 127.0.0.1:18789:127.0.0.1:18789 USER@SERVER_IPReplace USER and SERVER_IP with your VPS login details. Keep the tunnel running, then open the dashboard’s localhost address in your browser. Complete the authentication process shown by OpenClaw.
This method does not require a public URL or reverse proxy. Keep gateway authentication enabled and avoid opening port 18789 to the internet.
3. Troubleshoot dashboard connection problems
If the dashboard does not connect, inspect the gateway and follow its logs:
openclaw gateway status
openclaw logs --follow
Check for authentication failures, an incorrect address, port conflicts or a stopped service. On a VPS, also confirm that your SSH tunnel remains connected.
When a configuration fix requires restarting the managed service, use:
openclaw gateway restartThen check gateway status again. Changing the port alone does not resolve authentication or remote-access problems.
Send a test message to your AI assistant
Use the dashboard chat to send a simple natural-language message, such as “Reply with a short greeting.” An AI reply confirms that this conversation can reach a working model, not just load the dashboard.
After configuring messaging channels, test each separately. For example, send a Telegram message from an approved account and confirm that a reply arrives. Channel connectivity alone does not prove that pairing rules or message delivery work correctly.
Optional: Check GitHub CLI access
For an integration that uses GitHub CLI, check GitHub access separately from OpenClaw’s gateway health. First, verify the active GitHub account:
gh auth statusIf authentication is missing, run gh auth login and follow GitHub’s sign-in instructions.
Then test access to a specific repository:
gh pr list --repo OWNER/REPO --limit 5
gh pr view PR_NUMBER --repo OWNER/REPO
Replace the placeholders with your repository and an existing pull request number. These commands list open pull requests and inspect a selected request without performing write actions.
Successful GitHub CLI commands confirm CLI access, not complete OpenClaw integration. Test the configured agent separately before relying on it for GitHub operations
What are the most common OpenClaw GitHub installation issues?
Even when following the official steps to install OpenClaw from GitHub, developers may encounter setup problems related to dependencies, configuration files or service startups. Identifying these issues early helps ensure the gateway and services run correctly.
Below are some common OpenClaw installation errors and practical troubleshooting steps to resolve them.
1. Installation script not running
One of the most common issues occurs when installation commands fail to execute properly.
This can happen due to:
- Outdated Node.js versions
- Missing pnpm package manager
- Incorrect shell environment
- Insufficient system permissions
How to fix it
- Verify your Node.js version:
node -v OpenClaw requires Node.js v22 or later.
- Ensure pnpm is installed globally:
npm install -g pnpm - Run commands from a supported terminal, such as Bash, Zsh or PowerShell.
If installation scripts still fail, reinstall dependencies and restart the setup process.
2. Dependency or pnpm errors
Dependency issues are another frequent cause of installation problems.
Typical symptoms include:
- failed package installation
- corrupted dependency cache
- version conflicts between packages
OpenClaw error fixes
Clear the pnpm store and reinstall dependencies:
pnpm store prune pnpm install If the problem persists, remove the lock file and reinstall packages:
rm pnpm-lock.yaml pnpm install This rebuilds the dependency tree and often resolves installation conflicts.
3. API key configuration problems
OpenClaw requires API keys for supported AI model providers. If these keys are missing or incorrectly configured, the gateway may fail to process requests.
Common signs include:
- authentication errors
- failed AI responses
- warnings during startup
How to fix it
Add the required API keys through the configuration command:
openclaw config set anthropic.apiKey YOUR_API_KEY You can also verify configuration settings using:
openclaw config show Ensuring API keys are correctly configured is essential for running AI agents and automation workflows.
4. Gateway service not starting
In some cases, the OpenClaw gateway fails to start after installation.
This issue is typically caused by:
- port conflicts
- missing configuration values
- failed background services
Troubleshooting steps
Check the gateway status:
openclaw gateway status Review system logs for errors and confirm the default port (18789) is not already in use.
If needed, restart the service:
openclaw restart These OpenClaw error fixes usually resolve gateway startup problems and restore normal system operation.
What security best practices should you follow when running OpenClaw?
Because OpenClaw can run AI agents that interact with APIs, tools and system resources, securing your environment is essential. A misconfigured setup could expose sensitive data, allow unauthorized access or let agents execute unsafe commands.
Following a few core security practices helps protect your system while running OpenClaw locally or on a server.
1. Protect the OpenClaw dashboard port
The OpenClaw dashboard provides full administrative access to agents, integrations and configuration settings. By default, it runs on port 18789, so exposing it publicly can create a serious security risk.
To prevent unauthorized access, bind the gateway only to localhost in the configuration file:
"gateway": { "host": "127.0.0.1", "port": 18789 } This ensures the dashboard is accessible only from the local machine.
If you need remote access, use a secure tunnel such as:
- SSH tunneling
- Tailscale
- Cloudflare Tunnel
For example:
ssh -L 18789:localhost:18789 user@server Avoid directly forwarding port 18789 through your router or firewall. You can also block external access with firewall rules such as:
ufw deny 18789 To monitor active connections, run:
netstat -tlnp | grep 18789 2. Restrict AI command execution
OpenClaw agents can run shell commands, call APIs and interact with external services. Without proper controls, this could allow unsafe actions.
You can restrict command execution by configuring allowlists and sandboxing in the security settings:
"security": { "sandbox": true, "tools": { "allowlist": ["calc", "curl", "git status"], "deny": ["rm", "sudo", "dd"], "maxTimeout": 30 }, "workspaceRoot": "/safe/readonly/path" } These settings limit what commands agents can execute and prevent access to critical system operations.
Additional security practices include:
- disabling untrusted plugins or integrations
- manually auditing custom skills or scripts
- enabling mention-only mode so agents run only when triggered with commands like @openclaw
Using modern AI models with stronger prompt-injection protection can also reduce the risk of malicious prompts affecting agent behavior.
3. Secure API keys and credentials
API keys stored in the OpenClaw configuration file allow access to AI model providers and external services. If these keys are exposed, attackers could run unauthorized workloads or consume your API credits.
To protect credentials, restrict file permissions:
chmod 600 ~/.openclaw/openclaw.json You should also ensure the configuration directory belongs to the correct user:
chown $USER ~/.openclaw/ A safer approach is to store API keys in environment variables or a secrets manager rather than directly in configuration files.
Example .env configuration:
ANTHROPIC_API_KEY=sk-... OPENAI_API_KEY=sk-... Additional best practices include:
- Setting spending limits on AI provider accounts
- Rotating API keys regularly
- Creating restricted API keys with limited permissions
- Avoiding committing configuration files to Git repositories
Following these security practices helps prevent common risks such as dashboard hijacking, unauthorized command execution and API credential exposure while running OpenClaw. Once your environment is secured, it’s also important to keep OpenClaw updated to maintain stability and receive the latest improvements.
How do you update OpenClaw after installation?
OpenClaw is actively developed, so new updates frequently introduce bug fixes, security improvements and new features. Keeping your installation updated helps improve stability and ensures compatibility with the latest AI models, integrations and workflows.
The update process depends on how OpenClaw was originally installed. If you installed it through the CLI, you could update it using package manager commands. If you installed it directly from GitHub source code, updates require pulling the latest repository changes and rebuilding the project.
1. Updating CLI installations
If OpenClaw was installed globally using the CLI, updating it is straightforward.
Run the following command to update the CLI package:
pnpm update -g openclaw After updating, verify the installed version:
openclaw --version If the gateway service is running as a daemon, restart it to apply the update:
openclaw restart This ensures the updated version of the CLI and services is running correctly.
2. Updating source installations from GitHub
If you installed OpenClaw directly from its GitHub repository, updating requires pulling the latest changes and rebuilding the application.
Navigate to the project directory and run:
git pull Next, update dependencies and rebuild the project:
pnpm install pnpm build pnpm ui:build Finally, restart the OpenClaw gateway to apply the updates.
Updating regularly helps maintain system stability, reduces compatibility issues and ensures your OpenClaw environment benefits from the latest improvements. Once updated, you can consider deploying OpenClaw on a VPS to run AI agents continuously in a production environment.
Also read: VPS with Unlimited Bandwidth for High-Traffic Websites
Deploying OpenClaw on Bluehost VPS
To deploy OpenClaw on Bluehost VPS, choose a self-managed plan and use the one-click OpenClaw setup. Then configure your model provider, secure the OpenClaw gateway and connect your preferred messaging channels. Bluehost’s deployment option uses preconfigured containers to simplify installation.
Why use a VPS for OpenClaw?
A VPS lets your OpenClaw instance operate independently of your personal computer. It also provides configurable server resources and remote access for managing your self-hosted AI assistant.
1. Run independently of your laptop
When OpenClaw runs on a VPS, closing your laptop does not stop the server’s gateway. Your assistant can remain available through configured messaging channels while the server and required services remain operational.
2. Control your server environment
Bluehost Self-Managed VPS includes full root SSH access and allocated CPU, RAM and NVMe storage. You can install custom software, manage your user accounts and configure application permissions. You also control operating system updates and server maintenance.
Self-hosting does not mean all data stays on your VPS. OpenClaw stores its workspace and application state locally by default. However, external model providers receive the requests you send them, and messaging platforms process messages through their own servers.
3. Scale resources as workloads grow
You can upgrade CPU, RAM and storage as your resource requirements increase. Choose capacity based on the applications, tools and concurrent tasks running alongside your OpenClaw instance.
Also read: How to Connect Bluehost AI Credits to OpenClaw
How do you deploy OpenClaw on Bluehost VPS?
Choose between Bluehost preconfigured deployment and a manual installation from the GitHub repository. One-click setup simplifies provisioning, while source installation gives developers a local checkout to modify and build.
Step 1: Choose your self-managed VPS
Select a plan with suitable CPU, memory and storage for your workload. Bluehost offers multiple VPS configurations and resource upgrades, allowing you to adjust capacity as your requirements change.
Step 2: Deploy your OpenClaw instance
Use Bluehost one-click OpenClaw option to provision the application through preconfigured containers. Once provisioning finishes, click Manage to access the OpenClaw dashboard and continue configuration.
For a manual deployment, follow the source code installation steps earlier in this OpenClaw GitHub guide. Clone the repository, install dependencies, build the application and complete onboarding. This is an alternative to the preconfigured deployment, not an additional installation requirement.
Step 3: Configure model access and integrations
Connect OpenClaw to a supported model provider and complete the required authentication. Review your model configuration, workspace settings and messaging channels. Supported channels include Telegram, Slack and Discord, with their own setup requirements.
For optional GitHub operations, configure GitHub CLI in the environment where your agent executes commands. Authenticate the intended GitHub account and ensure its credentials are available to that runtime. With the appropriate tools enabled, your assistant can retrieve pull requests, review comments and GitHub Actions workflow runs.
You can then request pull request summaries or ask the agent to inspect failed workflow logs. These capabilities require GitHub access and tool configuration; VPS provisioning alone does not enable them.
Start with read-only access to specific repos where supported. Fine-grained tokens let you restrict repository access and permissions. Add write permissions only when an approved task requires them, such as creating issues or posting comments.
Step 4: Secure and test the deployment
Keep gateway authentication enabled and use an SSH tunnel or another documented secure remote-access method. An SSH tunnel lets you access the dashboard without exposing it through a public URL.
Protect your config file and credentials, restrict agent tools and configure human approval for sensitive command execution. Do not rely on a natural-language instruction alone to prevent unauthorized write actions.
Confirm gateway health, then send a message through the dashboard. Test each connected messaging channel separately before relying on the deployment for ongoing tasks.
Know what self-managed includes: Bluehost maintains the hardware, network and virtualization layer. You manage the operating system, application configuration, security hardening and software maintenance.
Run your assistant beyond your laptop. Explore Bluehost OpenClaw VPS hosting.
Final thoughts
OpenClaw makes it easier for developers and technical teams to build and run self-hosted AI agents and automation workflows within their own infrastructure. By installing OpenClaw from GitHub, you gain full control over AI models, integrations and system configurations while avoiding dependency on external SaaS tools.
Once installed, you can customize workflows, connect APIs and deploy AI agents that automate tasks across your systems. For production environments, running OpenClaw on a VPS ensures reliable uptime, stronger security and the ability to scale as your AI workloads grow.
If you plan to run AI agents continuously, consider deploying OpenClaw on our Bluehost OpenClaw to get dedicated resources, better performance and full infrastructure control for your AI automation stack.
FAQs
The official OpenClaw repository is hosted on GitHub under the OpenClaw organization. You can access the source code, installation instructions and documentation there. Developers can clone the repository to install OpenClaw locally or customize the platform. For production deployments, consider running OpenClaw on our Bluehost VPS to keep your AI workflows running continuously.
Yes. OpenClaw runs locally on macOS, Linux and Windows, with WSL2 available for a Linux-style workflow on Windows. Your OpenClaw instance can operate as an AI assistant while the computer remains running. Local installation supports testing and ongoing use; a VPS is optional.
No. Docker is optional for running OpenClaw. You can install dependencies and build the source code with pnpm, then run the application directly with Node.js. Docker provides an alternative containerized deployment method rather than a requirement for every installation.
The default dashboard URL is http://127.0.0.1:18789/. Run openclaw dashboard after the OpenClaw gateway starts, then complete authentication. For a VPS installation, access the dashboard through an SSH tunnel or another documented private-access method. The localhost address refers to the computer running your browser.
Yes. OpenClaw can run on a VPS independently of your personal computer. Bluehost offers one-click OpenClaw deployment using preconfigured containers. However, self-hosted infrastructure does not keep every interaction private: external model providers and messaging platforms still process data sent to their services.
A basic gateway using external models can run on 1 vCPU and 1 GB RAM, with 2 GB or more recommended. Source installation also requires Git, pnpm and a supported Node.js build, such as Node.js 24.15 or a newer supported 24.x release. Builds, browser automation and local models need additional resources.
Yes. OpenClaw is open-source software released under the MIT license. You can inspect the main branch, modify the application and redistribute it under the license terms. The required copyright and permission notices must remain in copies or substantial portions of the software.

Write A Comment